[I confess: this is a hybrid post in which I have broken the golden rule of 'knowing my audience'. As a result, you may well choose to read only part of it. The opening few paragraphs speak of my experience in the planning and presentation of a talk on astrophotography to a non-expert audience. After a couple of tiny footnotes you'll get to two appendices. The first of these was written in response to requests to provide a synopsis of the above talk; it includes a lot of links to various packages etc. So far, so good. The second appendix was added as a note of my parallel struggles trying to get a replacement laptop to run all my astrophotography needs in the way my rapidly-fading older one did; it's distinctly nerdy and is also replete with links.]
Wednesday 13 March 2024
Saturday 14 October 2023
House of (more) Treasures
In a recent post (here) I waxed lyrical on the subject of my first visit to the Canterbury Cathedral Library and Archives: “[sitting] at a desk surrounded by old wood with light filtering in through handmade glass, and to hear at one point the cathedral’s bells drifting through high ceilings”. I have now embarked on a six-session u3a course in the history of printing in Europe, led by Dr David Shaw, so get to spend even more time there. Such a joy.
The course itself, which is proving to be a delight, has thrown up several nuggets of information to be nestled in the memory, awaiting their time. For instance, did you know that the terms ‘lower case’ and ‘upper case’ derive from the days when a compositor – the person who set each letter of a font in place in order that a page might be printed using a manual printing press – had to select the next letter in a given word: their font cases were arranged such that the more common letters, ‘e’ for example, were close at hand (literally in the lower of the usual arrangement of two font cases) and those less commonly required, capital ‘Z’ perhaps, were in the more distant or upper case. When working with the speed allowed by ‘muscle memory’ this could save a lot of time and effort, rather like touch-typing – a skill I have, regrettably, never properly acquired. It’s no wonder the apprenticeship lasted seven years. This would often be followed by a period as a ‘journeyman’ during which the person would travel to various printing works in order to expand their experience and expertise. The size of a font was also defined at this stage, with 72-point corresponding to one inch (1″) – thus, a 12pt font corresponds to letter/number heights that fit within 1/6th of an inch or a little over 4 mm. This was, evidently, an early example of industrial standardisation; paper sizes were similarly standardised.
However, my principal focus in this post is to mention one of the books that David thoughtfully made available for us to marvel at during our mid-session break: Robert Boyle’s 1660 work on what we would now think of as air pressure and the like. Robert Boyle was a founding member of the Royal Society and made seminal contributions to the physical sciences; indeed, the slightly younger (but perhaps nowadays more famous) Isaac Newton used some of Robert Boyle’s work in order to derive an equation for the speed of sound in air. It is a personal pleasure to be able to turn the pages of this beautiful book; moreover, in a straw poll of the twelve other u3a members with me on this course, I discovered several people had retained a memory of hearing about ‘Boyle’s Law’ from their school days – a testament to his legacy.
 |
Having discovered – whilst drafting the earlier blog post referred to above – the extent of the time and energy required of the Cathedral’s hard-pressed Archive & Library staff to generate and supply images of old documents in their collection, I was delighted to find online a ready-made image of another copy of the this very book. The above title page and example illustration comes courtesy of the Science History Institute and is made available under Creative Commons Public Domain Mark 1.0 Universal. |
 |
| Reproduced from a document on David's website (here). |
The vicarage was situated just outside the boundary wall of Godmersham Park which, as her fans will know, has a close connection with the writer Jane Austin. It also commanded enviable views across the River Stour and as a result of this proximity and its age, suffered from damp at ground level; its library was accessed via an impressive spiral staircase. My parents-in-law lived in the Godmersham parish; indeed, my father-in-law served as churchwarden for fifty years. Moreover, my wife and I were married in Godmersham church in the late 1970s. The wedding was conducted by the then Vicar/Rector, Canon Graham Brade-Birks – who has been mentioned with affection in a previous post on this blog site, here. I’m pretty sure that he was already eligible for retirement when he conducted our wedding service but he was a man with the clear conviction of his calling, and retirement was postponed for as long as was practicable. However, after he eventually retired, the vicarage was sold (to ‘someone in television’ as I recall) in order to raise funds for the Church of England and there followed an extended interregnum: there was, therefore, no successor to whom the library’s contents could be passed. Thus, although non-stipendiary (unpaid, usually part-time) vicars/rectors were subsequently appointed, Canon Brade-Birks was indeed, in effect, the last of the line. Hoping to ensure the survival of the library’s contents, he left it to the nearby Wye Agricultural College where he had taught the odd course on soil science. (I have also written a post mentioning Wye College, where I was employed for a year after leaving school – see here). At the time, the College was a constituent part of the University of London. It was later subsumed into Imperial College and then closed and sold off; the collection that had been looked after by Canon Brade-Birks was eventually handed into the care of Canterbury Cathedral’s Archive & Library.
As I admitted, this is a tenuous link. For such links I am, however, grateful.
Sunday 20 August 2023
To Capture a Sunspot: solar filters

Occasionally I post on social media images captured using one of my telescopes in conjunction with a high framerate astro-camera. The image posted most recently was of the Sun, specifically of sunspots; I have collected a lot of these images in the past few years. In part this is because we’re nearing a period of maximum solar activity in the Sun’s eleven-year cycle and there’s simply more to see, but daytime astronomy also affords benefits when trying out new bits and pieces – it’s so much easier to learn how to handle new equipment in daylight. My recent foray was a case in point; I had bought a second-hand 80 mm refractor (see endnote [1] for more information and advice) and was keen to test its features after weeks of poor weather, ill-health and general busyness. This is definitely not a post on expensive astronomical equipment however, almost the opposite in fact: my aim is to share with you how I capture images of the Sun safely without spending a lot of additional money. It is a direct response to the questions posed to me by a member of a local amateur astronomy club: “Did you buy a solar filter cap or make one? What solar film did you use?”
 |
| The very first vaguely successful image of the Sun I managed to get. It was taken using my first telescope and an entry-level astro-camera and the combination of high magnification and small camera detector size meant that I captured only a small segment of the Sun’s disc. However, it remains in the slideshow of background images on my PC because it gives an impression of size and of the Sun’s neutral colour. Look closely and you’ll also see the ever-present convection cells as the Sun’s near-surface rises and falls. I’ve put a few more details into endnote [2]. |
This brings up to the matter of solar filters: how to reduce the amount of light entering our telescope to a level that will neither burn our eyeballs nor fry our camera’s detector chip. I should note at the outset that I am not discussing in this post the more dramatic phenomena associated with the Sun’s surface – no prominences or flares etc. of the sort shown in the images here. These require highly specialised (and expensive) equipment which limits the light entering the telescope to a specific wavelength only. The bits and pieces I describe here will allow all wavelengths (i.e. all colours) to pass through, but at very low intensity. Indeed, the solar safety filter material I use removes 99.999% of the light; which means that only one part in 100,000 reaches the telescope and your eye or camera.
Hopefully, the following series of images will explain it all …
 |
| Shown above is the setup in my garden I used to capture the image in question, a closer view of the solar filter fitted to the front of my telescope and an inset image of the filter’s rear face. Notice that there is a second solar filter fitted to the smaller finderscope, which is used to help find the ‘target’, shown to the upper right of the central image. The orange-coloured filter holder is a lid from an old food container (I think it was bought full of dry-roasted nuts!) with its central part removed using a hacksaw and the edges smoothed using sandpaper. The diameter of cut-out disk is as close as I could get it to the diameter of the telescope tube. The lid rim’s internal diameter has been reduced slightly using a strip of material cut from some anti-slip matting, fixed in place using double-sided tape. The final filter assembly was a snug fit over the front of the telescope. |
 |
| The essence of the whole DIY project is to find a tube that has some rigidity (enough to hold its shape when picked up) and has an internal diameter just larger than the outside diameter of the telescope in question. In the example above I have used part of the thick cardboard tube in which one might find a bottle of a certain single malt whisky: it just happened to fit nicely onto the 72 mm refractor I now use for observational astronomy and in my visits to primary schools etc. I buy high-quality solar film in A4 sized sheets since it’s a cost-effective way of fabricating several filter assemblies; it’s available from many stockists but I happen to use this one. You’ll also need some epoxy resin adhesive. (In passing, I note that there are pre-made solar filter assemblies also available to buy; a quick scan online suggests that they retail for about £50 and upward each.) |
Having found a suitable tube and cut it to an appropriate length, the key next step is to attach the solar safety film in such a way that it is not creased or scratched. I have found that a thoroughly clean sheet of glass is a great help; I keep an unused glass shelf for all such work but a smooth and flat ceramic tile might serve, as would a kitchen worktop if you can find a section that’ll not be needed for a day. Leaving the protective backing sheet on the foil, place it on the glass surface, foil upwards. Now mix enough epoxy resin to be able to run a thin thread around the end of the tube that’s going to take the solar safety filter; try not to get any epoxy on the tube’s inner surface, although small amounts aren’t critical. Carefully lower the end with the epoxy onto the foil sheet, avoiding any twisting or sliding motion: the foil should have remained flat against its backing sheet and the glass. There’s probably no need unless your tube is exceptionally light, but you could gently lay something like a small hardback book across the top in order to apply even downward pressure if you wish. Now walk away and leave the epoxy to set. Once all that’s done you can cut away the remaining foil with a pair of scissors and store it for another day.
Small adjustments are probably needed to ensure the filter assembly properly fits the end of the telescope. For reasons rooted only in habit, I tend to do this as a final step despite the fact that it’s probably wisest to get all this out of the way before attaching the safety film. There are all sorts of ways of achieving this, depending on how many millimetres larger the tube’s diameter is than the telescope. It may require only a layer of tape to the inside of the tube (- the end away from the foil of course as one doesn’t want to risk damaging the safety film if anything comes adrift). A layer or two of anti-slip matting fixed using double-sided adhesive tape works well, but it’s easy to find self-adhesive strips of felt or neoprene online and these can also be very useful. Remember, you are aiming for a fit snug enough that nothing’s going to fall off accidentally but not so tight that filter-destroying force is needed in order to slide it onto the telescope tube.
Small adjustments are probably needed to ensure the filter assembly properly fits the end of the telescope. For reasons rooted only in habit, I tend to do this as a final step despite the fact that it’s probably wisest to get all this out of the way before attaching the safety film. There are all sorts of ways of achieving this, depending on how many millimetres larger the tube’s diameter is than the telescope. It may require only a layer of tape to the inside of the tube (- the end away from the foil of course as one doesn’t want to risk damaging the safety film if anything comes adrift). A layer or two of anti-slip matting fixed using double-sided adhesive tape works well, but it’s easy to find self-adhesive strips of felt or neoprene online and these can also be very useful. Remember, you are aiming for a fit snug enough that nothing’s going to fall off accidentally but not so tight that filter-destroying force is needed in order to slide it onto the telescope tube.
 |
| Here’s a selection of the filters made thus far for telescopes of diameters from 50 mm (finderscopes and guidescope) to 150 mm in the case of my Newtonian reflector (- in that case, I used the ring from a cake baking tin that had lost its base to rust); I’ve also made filters for both my grandsons’ telescopes. All this was from two (or three?) sheets of solar safety film. Also shown in the image is a scrap of anti-slip matting and lengths of self-adhesive neoprene and of felt. |
Now for some images …
 |
| The above are some of the whole-disc images of the Sun I have captured prior to the one shown at the top of this post. The numbers and the sizes of sunspots vary enormously. We’re approaching the peak of the current 11-year solar activity cycle (expected in early 2024) so it’s unlikely you’ll look at the Sun at present without seeing any. Given that one could fit 109 Earths across the diameter of the Sun you’ll not be surprised that the largest sunspot in the image top left is several times the Earth’s diameter. Each sunspot cluster is given a unique identifying number – often preceded by ‘AR’ for active region; you can look this up here. Sunspots themselves are regions associated with the Sun’s magnetic field as it protrudes from the surface. Their dark appearance comes from the fact that they may be 2000°C cooler than their surroundings. Look closely and you’ll also notice brighter regions: those around the darker sunspots are called plages whereas the lighter patches often seen most easily near the edge of the solar disk are faculæ; these are associated with hotter regions in our field of view. |
 |
| If we take a closer look you’ll see that sunspots have a central dark region, the umbra, and a less dark surrounding area, the penumbra where temperatures are at an intermediate level between the umbra and the surrounding surface. |
 |
| Even the smallest scraps of solar film left over from making a telescope filter can have their uses. I captured this sequence of shots of a partial solar eclipse using my phone with a piece of safety film covering the phone’s camera lenses. The quality is what you’d expect from a handheld phone in a car park several miles from my house, but it was a fun thing to try. However, see below … |
 |
| This is a better view. It’s another partial eclipse, this time captured using one of my telescopes and astro-cameras. You may be able to discern the silhouette of some of the Moon’s mountain ranges as it clipped the Sun. We are extraordinarily fortunate in the fact that the Sun and the Moon both appear to us on Earth as discs that are about ½° wide – which is why the Moon can cover the Sun when suitably aligned. (By the way, if you hold your little finger out at arm’s length the fingernail end covers about 1° of the sky so it’ll easily cover the Moon; see here.) |
Happy sunspot hunting 😊
Endnotes
[1] For an overview of telescope types and what to consider and look for when buying try these web sites: here and here. I hasten to add that, like other second hand astronomy items, I bought the telescope mentioned in my opening paragraph from someone I knew to be trustworthy; one has to be careful.
Starting out in astronomy need not be prohibitively expensive – getting into photography, or off-road cycling, or many forms of sport, … might be comparable. However, amateur astronomers often talk in terms of ‘falling down the rabbit hole’: if you get hooked by the hobby you’ll find that there’s a never-ending series of spending opportunities ;-) My advice is to think about what it you most want to do/observe and start your search from there, being aware that as your aspirations evolve you may want to upgrade. The above links are only two of a multitude of places to get advice; read them in order to get an overview, but there’s a huge benefit to be had if you can try things out and talk to experienced people face-to-face. My suggestion is that you join your local amateur astronomy society. I’ve had loads of support from the lovely people here and also here and here. Most societies have websites and/or social media groups and you’ll find members only too keen to answer questions and offer informed advice. See here or here for a list containing many such societies in the UK. (Please note that these lists are not completely up to date, but they’ll get you started.) Once you have some equipment of your own you’ll find another slew of websites and helpful social media groups and online videos dedicated to users of similar kit.
[2] We all know that the Sun is both large and massive, and that it’s hot. In terms of size, the diameter at its equator is about 109 times that of our beautiful Earth; it represents 99.8% of the mass in our entire solar system. Its core temperature, which is where the fusion reactions occur that generate its output, has a temperature of about 15 million °C whereas the Sun’s surface temperature is about 5,500°C. As one rises into the corona (its outer atmosphere) the temperature rises again to about two million °C. (See here and here. Thus, what we perceive from Earth is the ‘cooler’ surface, referred to as the photosphere. In fact, the colour we see is strongly affected by the Earth’s atmosphere and by the limitations of our eyes: light from the blue end of the spectrum is preferentially scattered as the mix of wavelengths from the Sun passes through – this gives us our blue sky and leaves the Sun appearing yellow-orange-red as it nears the horizon but blindingly white when it’s high in the sky (- don’t look!). Our eyes fail to give us its intrinsic colour; if we could look at it through protective glasses from a space station our eyes would perceive the Sun as a white disc.
One of the simple calculations I used to set for students in their foundation year was to use something called Wein’s Law in order to estimate the temperature of the Sun’s photosphere. All that’s needed is the wavelength of light at the peak of the Sun’s emission, which we approximate to the wavelength of green-yellow light. If you’re that way inclined, try it out using the link above. The same formula may be used to estimate the surface temperature of other stars, or indeed the temperature within a furnace – the physics is identical. See also Video 13 in my lockdown series ‘Physics in the House’.
1700 words + endnotes
Endnotes
[1] For an overview of telescope types and what to consider and look for when buying try these web sites: here and here. I hasten to add that, like other second hand astronomy items, I bought the telescope mentioned in my opening paragraph from someone I knew to be trustworthy; one has to be careful.
Starting out in astronomy need not be prohibitively expensive – getting into photography, or off-road cycling, or many forms of sport, … might be comparable. However, amateur astronomers often talk in terms of ‘falling down the rabbit hole’: if you get hooked by the hobby you’ll find that there’s a never-ending series of spending opportunities ;-) My advice is to think about what it you most want to do/observe and start your search from there, being aware that as your aspirations evolve you may want to upgrade. The above links are only two of a multitude of places to get advice; read them in order to get an overview, but there’s a huge benefit to be had if you can try things out and talk to experienced people face-to-face. My suggestion is that you join your local amateur astronomy society. I’ve had loads of support from the lovely people here and also here and here. Most societies have websites and/or social media groups and you’ll find members only too keen to answer questions and offer informed advice. See here or here for a list containing many such societies in the UK. (Please note that these lists are not completely up to date, but they’ll get you started.) Once you have some equipment of your own you’ll find another slew of websites and helpful social media groups and online videos dedicated to users of similar kit.
[2] We all know that the Sun is both large and massive, and that it’s hot. In terms of size, the diameter at its equator is about 109 times that of our beautiful Earth; it represents 99.8% of the mass in our entire solar system. Its core temperature, which is where the fusion reactions occur that generate its output, has a temperature of about 15 million °C whereas the Sun’s surface temperature is about 5,500°C. As one rises into the corona (its outer atmosphere) the temperature rises again to about two million °C. (See here and here. Thus, what we perceive from Earth is the ‘cooler’ surface, referred to as the photosphere. In fact, the colour we see is strongly affected by the Earth’s atmosphere and by the limitations of our eyes: light from the blue end of the spectrum is preferentially scattered as the mix of wavelengths from the Sun passes through – this gives us our blue sky and leaves the Sun appearing yellow-orange-red as it nears the horizon but blindingly white when it’s high in the sky (- don’t look!). Our eyes fail to give us its intrinsic colour; if we could look at it through protective glasses from a space station our eyes would perceive the Sun as a white disc.
One of the simple calculations I used to set for students in their foundation year was to use something called Wein’s Law in order to estimate the temperature of the Sun’s photosphere. All that’s needed is the wavelength of light at the peak of the Sun’s emission, which we approximate to the wavelength of green-yellow light. If you’re that way inclined, try it out using the link above. The same formula may be used to estimate the surface temperature of other stars, or indeed the temperature within a furnace – the physics is identical. See also Video 13 in my lockdown series ‘Physics in the House’.
Wednesday 2 August 2023
House of Treasures
One morning at the end of June I was sitting at a desk in Canterbury Cathedral’s Archives reading room. This was my first time in the Library/Archives, despite having lived and worked within a few miles of the place since 1985; it had taken the kind invitation of historian and retired academic Dr David Shaw – mentioned in my previous post – to bring about a much overdue visit. In front of me were all three volumes of Isaac Newton’s seminal work on the mathematics that govern so much of the observable universe; a work which, quite literally, redefined the way we understand our the world. Rarely have I touched such valuable documents. However, this is a digression and I shall relegate it to a postscript below*. This post is primarily about glass: specifically, glassmaking in England at the time of the Tudors and Stuarts ...
 |
| This is the ‘Proclamation touching Glasses’ (reference CCA CC/A/P/P/1/PR/48) at the heart for my visit to the Cathedral Archives. Unusually, but rather wonderfully in my opinion, Canterbury Cathedral Archives also holds and manages the city archives of Canterbury: were that not the case I may never have had this rare opportunity. (Sadly, a set of records relating to the county, being the archive of the Diocese of Canterbury, was removed from the collection some ten years ago and is now held by Kent County Council in the County Town of Maidstone.) The images shown above were created for me by the Cathedral Archives and are used with the kind permission of the Chapter of Canterbury. |
 |
| The Tudor rose and the thistles in this illustrated opening letter ‘I’ tie the origin of the proclamation firmly to its period. |
All in all, I had a wonderful few hours in the Archives. The welcome I received was second to none and the ‘atmosphere’ in there came pretty close to defining my dream library environment. To sit at a desk surrounded by old wood with light filtering in through handmade glass, and to hear at one point the cathedral’s bells drifting through high ceilings was bliss.
My warmest thanks go to David Shaw for his thoughtful invitation, to the two Archives reading room staff who registered me and settled me in, to their Digitisation Officer for creating digital images of the proclamation and to the Archives and Library Manager who approved my request to show the images in this post and offered some valuable comments on an earlier draft.
* Postscript: Turning the pages of Isaac Newton’s Philosophiæ Naturalis Principia Mathematica (1687; ‘The Mathematical Principles of Natural Philosophy’, see here and here) was a very special treat for anyone with an interest in science, and particularly for a physicist like me. Isaac Newton laid the groundwork for so much of the physical sciences still taught in schools and colleges: an intellectual giant. The text of the Principia was written in Latin, which I cannot read, but Newton and I share a common second language: that of mathematics. I only had time on this visit to enjoy the first of the three-volume work, but that proved ideal in the sense that I could focus properly on the many pages Newton used to define his terms and establish key axioms and proofs. Thus, I could discern that he used ‘C’ for speed, ‘S’ for distance and ‘T’ for time and would write the classic relationship between them as C = S : T (c.f. the c = s/t form one would see today). Moving from there to acceleration, momentum etc. became possible on this basis. Noticeably, there is much space given to the use geometric proofs. There are other historic scientific documents held within the Archive and now that I have my reader’s photo-ID card I shall be able to book a slot for return visits.
P.p.s. One afternoon, back in 1985/6, together with a couple of colleagues who were similarly bored of the mandatory ‘induction course’ we’d been dispatched to by our employer, I got the chance to look through several historical documents in the library at Herstmonceux Castle – including a beautifully illustrated contemporary account of James Cook’s first expedition on the Endeavour. As a schoolboy I don’t believe I ever committed truancy – I loved learning, so why would I – but I have no regrets about skipping class on that occasion ;-)
Further reading
There are a great many books/articles on the history of glass. For those with an interest in the glassmaking of England during the period of history of most relevance to this blog post I can share a few of the online resources I have consulted:
On early-modern glass
For an extended article on the history of glassmaking in England – including the use of wood and switch to coal see here.
On the scientific analysis of medieval glass (a PhD thesis).
For Historic England’s archaeological guidelines see here and also here and here.
There are other, more generic, books sitting on my shelves such as:
‘5000 Years of Glass’ edited by H. Tait (The British Museum Press, 2012; ISBN 978-0-7141-5095-6)
‘A Short History of Glass’ by Cloe Zerwick (Harry N. Abrams Inc., 1990; ISBN 0-87290-121-1)
‘The Glass Bathyscaphe’ by A. Macfarlane and G. Martin (Profile Books, 2003; ISBN 1-86197-394-2).
‘5000 Years of Glass’ edited by H. Tait (The British Museum Press, 2012; ISBN 978-0-7141-5095-6)
‘A Short History of Glass’ by Cloe Zerwick (Harry N. Abrams Inc., 1990; ISBN 0-87290-121-1)
‘The Glass Bathyscaphe’ by A. Macfarlane and G. Martin (Profile Books, 2003; ISBN 1-86197-394-2).
Friday 14 July 2023
The Pleiades: of daughters, poets and stars
In a recent post I succumbed to the temptation to issue a
cri de coeur in respect of my
exasperatingly slow progress learning how to capture long-exposure frames,
perhaps of 5-10 minutes duration, of faint astronomical objects like galaxies
and nebulæ. At the tail end of one of my many nights of trials I turned my
telescope towards something easy to identify: M45, the Pleiades, or Seven
Sisters, which is a cluster of mostly faint stars. (A cluster is simply a
relatively large group of stars held by their mutual gravitational attraction.)
By this stage – actually, only about 9 pm on a mid-February evening in 2023 but
it felt much later – I simply wanted something, anything, to show for all my
efforts.
 |
| The image on the left was derived from the best 75 of 103 five-second frames. The second image differs only in that I have labelled the stars that have names and have added their visual magnitudes (see explanation below). The field of view here is a square of almost 2° x 2°, so almost four times the apparent size of the Moon or the Sun. For those wanting a little more technical information, I’ve added a footnote [1]. |
I had never thought of employing
these less-than-dramatic images as the basis for a blog post until using them
for one of the short ‘science-lite’ pieces I write for my local u3a’s Facebook group. In its turn, this was mentioned in a comment I made on a FB
post (see here) on star clusters within our own galaxy, the Milky Way, posted by my
ex-colleague Dr Dirk Froebrich (who runs the Beacon Observatory and its
excellent HOYS ‘Citizen Science’ programme).
Dirk kindly ran the Pleiades star cluster through the software he’s been using
and this added an interesting new level to my simple image. Shortly after, my
fellow u3a tutor Dr David Shaw told me about a group of 16th century
French Renaissance poets who called themselves La Pléiade. They, in their turn, were named after an analogous
group of seven 3rd century BCE Alexandrian poets who took their name
– the Pleiad – from our star cluster.
We end up in Greek mythology with the seven daughters of Pleione (literally,
the Pleiades); these Seven Sisters had names you’ll see reflected in the labelled image
above: Maia, Electra, Taygete, Alcyone, Celaeno, Sterope and Merope. Their
mother joins them, as does another mythological figure claiming Pleione as his
mother: Atlas. Taken together, these additional layers of information were
enough to coax me to the keyboard. [Since originally posting this in mid-July the u3a's Astronomy Advisor, Martin Willock, has shared a link to an article in 'The Conversation' from December 2020 that I hadn't seen; it offers additional insight into ancient mythology surrounding The Pleiades, including that of Aboriginal Australians.]
Occasionally, if the muse is insistent, I might dare to try my hand at free-form or shape/concrete poetry (see
here for my very first attempt) but I make no claims whatsoever regarding my (lack
of) poetic ability or understanding. Similarly, although in my youth I read
translations of the Iliad, Odyssey and Aeneid – copies of which still sit on a
shelf in my study – I claim no depth to my knowledge of Greek mythology. I
think it wise to avoid straying too far from the scientific theme at the heart
of my blog so, even though I am merely an amateur astronomer and
astrophotographer, I will focus on this aspect.
Let’s start with an explanation of the other designation I gave in my opening paragraph for this cluster of stars: the Pleiades and the Seven Sisters are covered, but what of M45? Charles Messier was a French astronomer with a special interest in the discovery of new comets. There were, however, objects that might look a little like a comet in a small telescope but which could be ruled out on closer study since, unlike a comet, they moved exactly as a star would in the night sky. One of Messier’s important contributions to comet discovery was the compilation of a list of these non-cometary objects. His catalogue, the final version of which was published in 1781 and which contained 103 of such objects, enabled fellow comet-hunters to avoid ‘wasting their time’. Messier-45, or M45 – the Pleiades – is simply the 45th entry in his catalogue of things not to bother with if one is trying to spot a comet. Ironically, his ‘avoid’ list has become a ‘to do’ list for many amateur astronomers. This is perhaps especially so for those who prefer astrophotography to visual observation and wish to produce their own images of visually fascinating objects beyond our solar system like nebulæ, supernova remnants and galaxies. In my own case, although I do aspire to capturing a few such images, there’d be no point in saddling myself with such a demanding checklist at my age ;-)
Look them up in books, apps or online and you’ll be told that the Pleiades can be seen with the naked eye within the constellation of Taurus (see diagram below, a screenshot from a piece of free software called Stellarium). Actually, that’s only really true in the absence of significant light pollution since it's a relatively faint cluster of stars. Even under good observing conditions one can usually only pick it out in the corner of one’s eye. This is because, whilst our central vision is great for detail and colour it’s not so good on faint objects – for these we’re better off letting the light fall on the off-centre parts of the retina where the receptors don’t permit a sharply resolved image but are better suited to low light levels. The standard advice is to ‘look away a little’ whilst remaining aware of what’s in the periphery of your vision.
 |
| Stellarium is not the only useful navigation aid for the night sky, but it’s certainly a very good one. This view is approximately 60° across, so a small fraction of the 360° horizon; it is the view towards the West as it would have been in mid-February 2023 at about 21:30. The Pleiades is indicated by my arrows. By the way, in
Japan the cluster is referred to by a different name: Subaru, which mean ‘unite’. Furthermore, the Pleiades (along with Orion) get a mention in two of the books of the Old Testament - Job, which probably dates to the fifth or sixth centuries BC, and Amos, which refers to events at around 750 BC. |
Despite its common name of the Seven Sisters, there are about 1000 stars in the cluster although most are too faint for all but the most powerful telescopes to pick out. Even the brightest stars in the cluster are still relatively faint. The brightness of celestial objects is measured on a scale of apparent magnitudes: a counter-intuitive scale on first sight that has the faintest objects assigned the highest numbers. Each step of 1 on the apparent magnitude scale corresponds to a change in perceived brightness by a factor of 2½ (see footnote [2] for more detail). Thus, bright Venus has a magnitude of -4.7 at the time of writing but much fainter Polaris, the Pole Star, is +2 and this actually means that Venus appears to us more than one hundred times as bright as Polaris. Our eyes can, on a clear night and without too much light pollution, see stars ‘down to’ a magnitude of about 5 or 6; at my age and with the excessive street lighting near my house it’s definitely more 5 than 6 – probably even m = 4! So it's no surprise that the Pleiades are difficult to pick out without a bit of technology since even the brightest of them reaches only 2.8 in magnitude (Alcyone). However, the variation in magnitudes within this faint cluster gave me a means to check out the detection limits of my telescope and astrocamera. It’s apparent that, even with a total of only 6¼ minutes of light-gathering, I can detect stars with a magnitude approaching 10; I’m content with that.
We come now to the clever bit, and something totally new to me until a couple of weeks ago when I read the post by Dr Dirk Froebrich I mentioned above. Dirk and his team are using data from the European Space Agency’s Gaia telescope to identify clusters of young stars within the Milky Way. The Gaia project is progressing with its aim to measure the distance and motion of 2000 million stars (please see footnote [3] for details). Astronomers like those in Dirk’s team can use its database to check which stars within a telescope’s field of view are actually within a cluster – i.e. grouped by virtue of their mutual gravitational attraction – or simply happen to be in the line of sight. To be part of a cluster our stars ought to be at similar distance from us and they ought to be moving together within the Milky Way, albeit with some small additional ‘random’ motion as the stars orbit the centre of their cluster. What Dirk kindly shared is an application of this methodology to the distances and proper motions of the stars in the part of the night sky that includes the Pleiades; the results are shown below.
 |
| The left hand plot shows the distances of the stars one observes in the part of the sky occupied by the Pleiades – some of which may be a part of the cluster and others may simply be in our line-of-sight. Notice the red-coloured spike indicating those stars at approximately the same distance from Earth, a median distance of 444 ± 1 light years. Sitting at the same distance is however not sufficient to qualify a star as being a member of a cluster as it also needs to have a similar proper motion to other members; i.e. it needs to be moving through space as part of the cluster. The plot to the right gives us that information. It shows, for all those stars in the red-coloured spike, their proper motion in right ascension (the celestial analogue of longitude) and declination (the analogue of latitude). Only those stars with similar values, again represented in red, can be considered to be members of the Pleiades cluster. The Gaia data yields a little more in respect of the Pleiades – indeed, all the stars it has measured – in that one may plot the colour of its constituent stars against its absolute magnitude and generate a Hertzsprung–Russell diagram, which gives an indication of the stars’ ages, but I have relegated this to yet another footnote, [4]. |
Apart from the fun I’ve had in writing this, I’ve learnt once again that there’s always more to see than the obvious: I’ve known of the Pleiades since my first forays into stargazing as a teenager, now I treasure them as a sight even more. It’s also caused me to consider afresh the facts I took for granted when writing about some of the binary star systems I’ve imaged in the past (e.g. here and here). Thanks for reading J
~1750 words + footnotes
Footnotes:
[1] The 3k x3k pixel image is defined by my
Altair Astro 533c astrocamera (4 fps, sensor at -5° C, gain=400, dark level=192;
no calibration frames) on a Skywatcher 72ED refractor fitted with a 0.8x
reducer/flattener; the telescope was mounted on a Skywatcher HEQ5 GoTo mount
controlled from my elderly laptop by Carte du Ciel via ASCOM. The mount was
polar aligned (i.e. to the celestial pole, which is close to Polaris, the Pole
Star) using a plate-solving routine included in SharpCap – this is what facilitated
exposures as long as 5s. Image capture was handled using SharpCap, with the
best frames, i.e. a total integration time of only 6¼ minutes, stacked initially
using DeepSkyStacker – my first trial of this software – and then using PIPP
and Autostakkert3. The image was processed using my old version of Photoshop.
[2] 2.512 to be a little more precise, or to get
it entirely correct it’s 5√100
– the fifth root of 100 – which means that a star of apparent magnitude 1, m1,
will appear one hundred times as bright as a star of m6. For a full description
of both absolute magnitudes (M) and the apparent magnitude (m) scale I’ve mostly used
in this post see here.
[3] Distances are determined using measurements
of parallax, i.e. the apparent change of position of an object against its
background as the observer changes position. (Try holding your thumb at arm’s
length and use it to hide a distant object like a TV aerial or street sign
whilst one eye is closed; now switch to the other eye and notice the apparent
shift in the object’s position relative to its background: that’s parallax.) In
the case of Gaia’s measurements of stars, the analogue to switching between
eyes is to conduct a pair of measurements six months apart – so on opposite sides
of the Earth’s orbit around the Sun. What comes out of these measurements is a
parallax angle, and thence corresponding Earth-star distances – calculated
using trigonometry on the basis of the diameter of the Earth’s orbit being the
base of an isosceles triangle – are usually quoted in Parsecs (pc), which is
approximately the same as 3.26 light years (ly). For a fuller explanation, see here or here. Determining the motion of our candidate stars requires that one follows their
positions relative to the cosmic background over time; astronomers refer to a
star’s ‘proper motion’.
[4] The colour of a star is a pretty good proxy for its surface temperature (- think about metal being heated, glowing increasingly bright red as the temperature rises until appearing ‘white hot’) and its magnitude may be used instead of its luminosity. So, by plotting a graph of colour against magnitude we’re in effect plotting temperature against luminosity and that can tell astronomers/astrophysicists a lot about the age distribution of stars in a cluster. (There is additional information here and here.) The plot Dirk obtained indicates that the stars which constitute the Pleiades formed no more than 200 Myr ago; the online resources I looked at before drafting this post (e.g. here and here) suggest a figures of 100 Myr ranging up to 150 Myr depending on the stellar evolution model adopted – so that’s a reasonable match.

Monday 12 June 2023
Videos: the gap between teaching and learning
Two years after I retired I stepped back into the hobby I had enjoyed as a schoolboy but had felt obliged to set aside in favour of ‘getting on with life’. (There’s a whole blog series buried in that phrase, but it’ll not be written by me … unless some of my earlier posts, like this one, cover some of those bases.) I’d been saying for years and years that I missed it and had long declared that I would spend a fraction of my pension pay-out in order to get the telescope that I’d always wanted as a teenager. With hindsight, a useful rejoinder might have been “be careful what you wish for”.
Cutting a long and convoluted story short (more details here should you wish to know; if you’re having trouble sleeping there are also a few updates*) I finally put my money where my schoolboy aspiration lay and bought a 150 mm Newtonian reflector from a local supplier, which sat beautifully upon a sturdy tripod and equatorial mount. Patrick Moore would have used the old-style measurement of six inches back when I was a kid watching ‘Sky at Night’ on a low resolution monochrome TV – this was the size he’d recommended and it had evidently lodged in my mind for more than half a century. It was lovely; so much fun. I spent the first hours of many a clear night gazing through it at all those objects I’d struggled to see using my original tiny pocket-money telescope. However, the more I gazed the more my aspirations grew. Unfortunately, the associated challenges seemed at times to expand even faster.
 |
| Here it is: one of the most fun presents I’ve ever treated myself to, fresh out of the box and assembled indoors awaiting better weather, and darkness. |
The core issue was that I wanted to capture images of what I was looking at, and in the process to go beyond the limitations of my eyes – which the attributes of a superbly flexible short focal length ‘camera’, but limited by a relatively inefficient light capture mechanism. I tried to use my smartphone, but with limited success. The next step was to persuade family members to buy me an entry-level astronomical camera as a Christmas present – but that also necessitated retro-fitting motorized drives to my equatorial mount and loading (and learning to run) a whole family of software packages on my PC. All this software requires effort if it is to be used to the full and it was at this point that my attempts to learn from blog sites and YouTube began.
“YouTube is your friend” was a mantra cited by several people at my local amateur astronomy society. (Sadly, their meetings are held at a venue which is over an hour’s drive away: a journey I don’t attempt these days, although I can get to the much closer Beacon Observing Group - but that's not quite the same thing.) There’s certainly a lot of relevant material there, along with copious bite-sized snippets of advice on astronomy-related Facebook groups and the like (e.g. Altair Astro's). I muddled through on this basis and in the process collected a few pleasing images of major solar system objects, along with a few binary star systems. I still haven’t captured an image of Mercury, but that’s another story. However, this learning curve was insignificant compared to the issues associated with my deeper aspiration of capturing images of nebulæ within the Milky Way and more particularly images of other galaxies. Another telescope, a computerized mount and a second astrocam were required. Actually, a pair of telescopes was needed: a small one to piggy-back on the main ’scope in order to control the mount so that the main telescope+astrocam holds the target object steady in the field of view for extended periods of time. This is where the limitations of trying to learn something from online sources really kicked in since the technical demands on setting up the assembled equipment are severe and the slew of new software to get to grips with (and to get in communication with the equipment!) is prodigious. There is so much to learn and to master; even if astrophotography was my only hobby or commitment I would struggle to set aside enough time.
 |
| This is the ‘new’ setup – actually, both the telescope and the astrocam (the larger of the two purple cylinders where otherwise an eye might be) were purchased second-hand from trustworthy people – photographed during a session of daytime astronomy whilst imaging sunspot clusters. Getting used to the new kit in the light was extremely useful, although it can never resolve the issues associated with long-exposure imaging. (It's taken me by surprise a little bit how difficult I'm finding this given that I spent an entire career writing and using complex software in order to handle large datasets and get something meaningful out the other side. An acquaintance - himself an experienced astronomer and astrophotographer with his own observatory - recently described it as being 'rocket surgery'; he's not wrong. Perhaps it's an age thing ...) |
Online is usually the only place to go for information since ‘deep sky’ astrophotography is intrinsically a solo pursuit (i.e. suitable for introverts). Having said that, there are a handful of people who have offered useful bespoke advice via email or similar - people like Ewan who I met at the local astronomy society I mentioned earlier, and like Alex at First Light Optics. Nevertheless, I’d dearly love to have an experienced person nearby who’d be willing to spend an evening or two giving me a tutorial – but even those few I know with a nearby postcode use different kit and more importantly, different software packages. So, I’m back online again.
This is probably true of all hobbies, but search for topics in ‘astrophotography’ on YouTube and you’ll be met with an ocean of suggested videos, many of which have words like ‘beginners’ and ‘tutorial’ in their titles. They are tags I have learnt not to rely on. For every instructional video that tackles beginners’ issues well – i.e. none of those frustrating missed steps or the use of jargon etc. – one might have waded through another five that confuse or even demotivate. On some topics I have failed to find a single video that addressed my questions and therefore that I’d recommend to another struggling beginner. Don’t get me wrong, I admire and am grateful to these people for at least making the effort. Moreover, most of their videos contain nuggets of useful information and I’m confident that, should I ever move on from my present inexperienced state, some will be of use as I seek to progress further. I’m also acutely aware of my own limitations, having uploaded many hours of physics-related video material during the more severe phases of the COVID pandemic. These were notionally aimed at my local u3a (University of the Third Age) and specifically for those with a non-science background: see here and also here. I have already been told by a couple of people that I ‘lost’ them in some instances – for them, at the very least, I failed to deliver. I had attempted to teach something, but those viewers had not been able to learn from the material I supplied. That’s down to me, not to them. Thus, even someone like me who used to teach for a living – and do it well by most accounts# – found it difficult. It was easier when I was in the lecture theatre, face-to-face with students and thus able to fine-tune my words in real-time as I responded to the learners in front of me. Such responsiveness is simply not possible when limited to the one-shot nature of a YouTube video and its analogues. Or is it …?
These reflections have suggested to me a way forward which might work were it practicable – which, unfortunately, it probably isn’t without time-consuming effort, coordination and sponsorship. What if one were able to bring together an experienced practitioner and one or two (or more) beginners and film the interaction as our expert got the beginners up-and-running. The expert has the resources needed and the beginners will keep the pace and details at an appropriate level. If none of them has simultaneously to handle the filming/editing process then such matters as line-of-sight, clarity of shots, sound levels etc. can better be assured. Thus, we have a team effort; expensive of time etc. but potentially better able to generate something of worth. Of course, this would be a long series of videos since one would need to cover a wide spectrum of tasks using various combinations of equipment and software.
It’s a dream, nothing more.
______________________________________________________________
* here, oh and here and also here ;-)
# Please forgive me if this sounds boastful. In truth, I have never felt completely satisfied with my skill as a teacher and I know I have made mistakes, but I look back on decades of complimentary feedback from students and can smile nevertheless at a job done to the best of my ability.
Saturday 11 March 2023
Lost, and found again: the Graveney boat and me.
By my reckoning, I was seventeen. Reverse the digits and you’ll arrive at my age on my next birthday. I was, in a great many respects, another person; a person who so easily might have chosen, or have stumbled through a doorway other than the one I actually took, ending up who-knows-where.

A model of the clinker-built late ninth century ‘Graveney Boat’ displayed within the Fleur de Lis museum in Faversham – almost on my doorstep, but only visited recently in the company of my teenage grandsons (who are ‘collecting’ the fifty or so small independent museums in our region … as one does.) When I saw this tiny model in its display case I couldn’t help but smile; read on to find out why.
I’ve mentioned serendipity – perhaps that ought to be providence
– many times in my posts (e.g. in the first post of a short series reflecting
on my career as a scientist, here) but a recent visit to the Fleur de Lis museum in Faversham provided a rather joyful reminder of its potential. Back in the
day, I used to volunteer my weekends as a helper on local archaeological
excavations. We’d be picked up early in the morning and driven to wherever there
was a need for ‘emergency archaeology’, by which I mean the desire to uncover
artefacts and learn as much as one could in the limited time before a developer’s
bulldozers moved in. Some years would elapse before such sites/finds were
afforded protection under law (see here and here) so it really did feel like a valuable and an exciting thing to do. Also, I
was a seventeen year old with zero interest in sports – chronic asthma at a
time when treatments were limited, two left feet and distinctly bookish
tendencies coupled with a well-developed inferiority complex – but with the
usual innate need to be doing ‘something’. Volunteering in this way fitted the
bill perfectly: an inexhaustible excuse for reading, small groups of
like-minded people and working outdoors in out-of-the-way locations. As a
bonus, my dad was a bricklayer and so the instruction to bring your own
pointing trowel was easy to follow. What’s not to love?
Pursuing archaeology as a career appealed to me a great
deal. At this distance from the person I was back then I cannot begin reliably
to reconstruct the thought processes that steered me towards studying physics
and then beginning chemical physics research. The existence of radiocarbon
dating techniques and the later introduction of geophysical probes like
resistivity and magnetometry would only serve to heighten my interest, but by
then archaeology had become an armchair hobby overshadowed by my fascination
with the physical sciences. (The line became blurred a little during the final
years of my professional career when I was able to use my chemical physics
expertise to make a small contribution to heritage/conservation projects: see
here, here and here.)
I only volunteered for one season in 1970 (maybe a little in
1969? – other priorities, like final school exams and university applications,
squeezed it out thereafter) but the joy of taking part has stayed with me ever
since. Having said that, you may be surprised when I admit that, somewhere
along the line, I forgot the associated details. I could always have told you
that our mentor in this voluntary work was enthusiastic archaeologist Mr. Jim Bradshaw
(who died in 2001); he was a good person to learn from as I recall. I also remember that the two
multi-weekend digs I took part in during this period were poles apart in their
nature: well-drained flat farmland abutting an oil depot which was hiding a
Romano-British residential/industrial site, and mud-up-to-the-armpits marshland
which revealed a ninth century boat. In one case, the land would return to being
farmed and the other was in the way of a major drainage channel.
The Romano-British site (see the 1990 aerial image below, with links) had apparently been known about for several decades, with bits of pottery being turned up by the plough now and again. More excavations were conducted nearby in the decades following my involvement and within a much better framework of legal protection than the one I was a part of. (These later digs were as a prelude to the deserted oil depot’s removal in favour of housing.) I remember exposing a hearth – a flat patch of hard reddened soil in essence – and being shown how to distinguish ‘random’ chunks of flint, found in abundance in the region, from the remains of an ancient drystone wall or a well-constructed path. However, the highlight was exposing a small but whole clay jar. I had Mr. Bradshaw and a few others clustered around me as I was talked through the safe way to excavate and lift it. The best guess at the time was that it had once contained perfume.
 |
This aerial image of the location of the Wye Romano-British site was taken in 1990, before later development and the excavations that preceded it. Further information may be found in reports submitted by Mr. Bradshaw and by those making reference to his work: here from 1970 in Section II, here from 2016 from 2016 and here in paragraph 2.2 from a national archive. |
As you’ll no doubt recall, what prompted this post in the first place, and the online research undertaken in order to write it, was the happy accident of finding mention of ‘The Graveney Boat’ during my extended exploration of Faversham’s Fleur de Lis museum. (The Graveney Marshes, I ought to explain, are sited between Faversham and the North Kent coast (UK); there is also a village of Graveney.) None of the images I could find do justice to the mud; nor do they convey the camaraderie that coping with it engendered. However, I’ve included one below along with a slew of links to associated news items and formal reports; this was, without doubt, a big deal. Whilst at the museum I had a brief conversation with someone working there during which I asked about the fate of the boat. She informed me that The National Maritime Museum, who had taken overall charge of the project and had all the recovered material sent to them at the time, still retained the excavated timbers. Apparently, it’s still being stored under water as there are no funds to conserve it further – let alone to repatriate it to the nearby Faversham museum. Having been involved in a small way with the conservation of Henry VIII’s famous warship ‘The Mary Rose’ (here) I must admit that I felt very sad that funds didn’t exist to allow the excellent marine conservation resources in Portsmouth to be brought into play. C’est la vie, I suppose.
 |
The images above are both taken from a 1971 paper in a publication called ‘Antiquity’; there’s another paper, less easy to access, published the following year in ‘Studies in Conservation’. Perhaps the feel of the place and the excavation work required is better conveyed in this (pre-HD) video, available via the Fleur de Lis museum’s web site. |
All-in-all, I’ve had a pleasant trip down Memory Lane and
had great fun piecing back together again the details of my season in the field
as a volunteer archaeologist – a career path never trodden.
Wednesday 11 January 2023
It’s got holes in it!
What do you see when you look at the Moon?
If you live with high levels of light pollution from streetlamps or commercial buildings or an annoying floodlight on a neighbour’s house – all of which are significant problems – then the Moon may be one of the few celestial object you can bank on seeing in the night sky. It’s a reliable presence whether we’re in the middle of town or the depths of the countryside. So, what do you see? A bright disk/crescent with some darker patches; perhaps you also notice a few curved lines?
A couple of weeks before Christmas I had the opportunity of showing more than fifty 9-10 year-olds* and their teachers what the (daytime) Moon looks like through a telescope. A handful told me that they had an older sibling or a parent with a telescope, but for most this was evidently a wholly new experience. In a brief introduction inside their warm school building – it was -2ºC outside – I’d suggested two or three things they might look out for: the lava fields/‘seas’ for sure, but also the distinct curve of the lunar Alps and the nearby crater named after Archimedes. For the majority, the first-timers, they all – and I do mean ALL – seemed to find the experience quite special, almost magical in some cases. Some of their reactions were priceless; three or four of them looked, looked again and then told me that the Moon had holes in it, which was a novel way to describe lava seas and deep craters. One or two uttered something I pretended not to hear, but which made me chuckle inside nevertheless.
 |
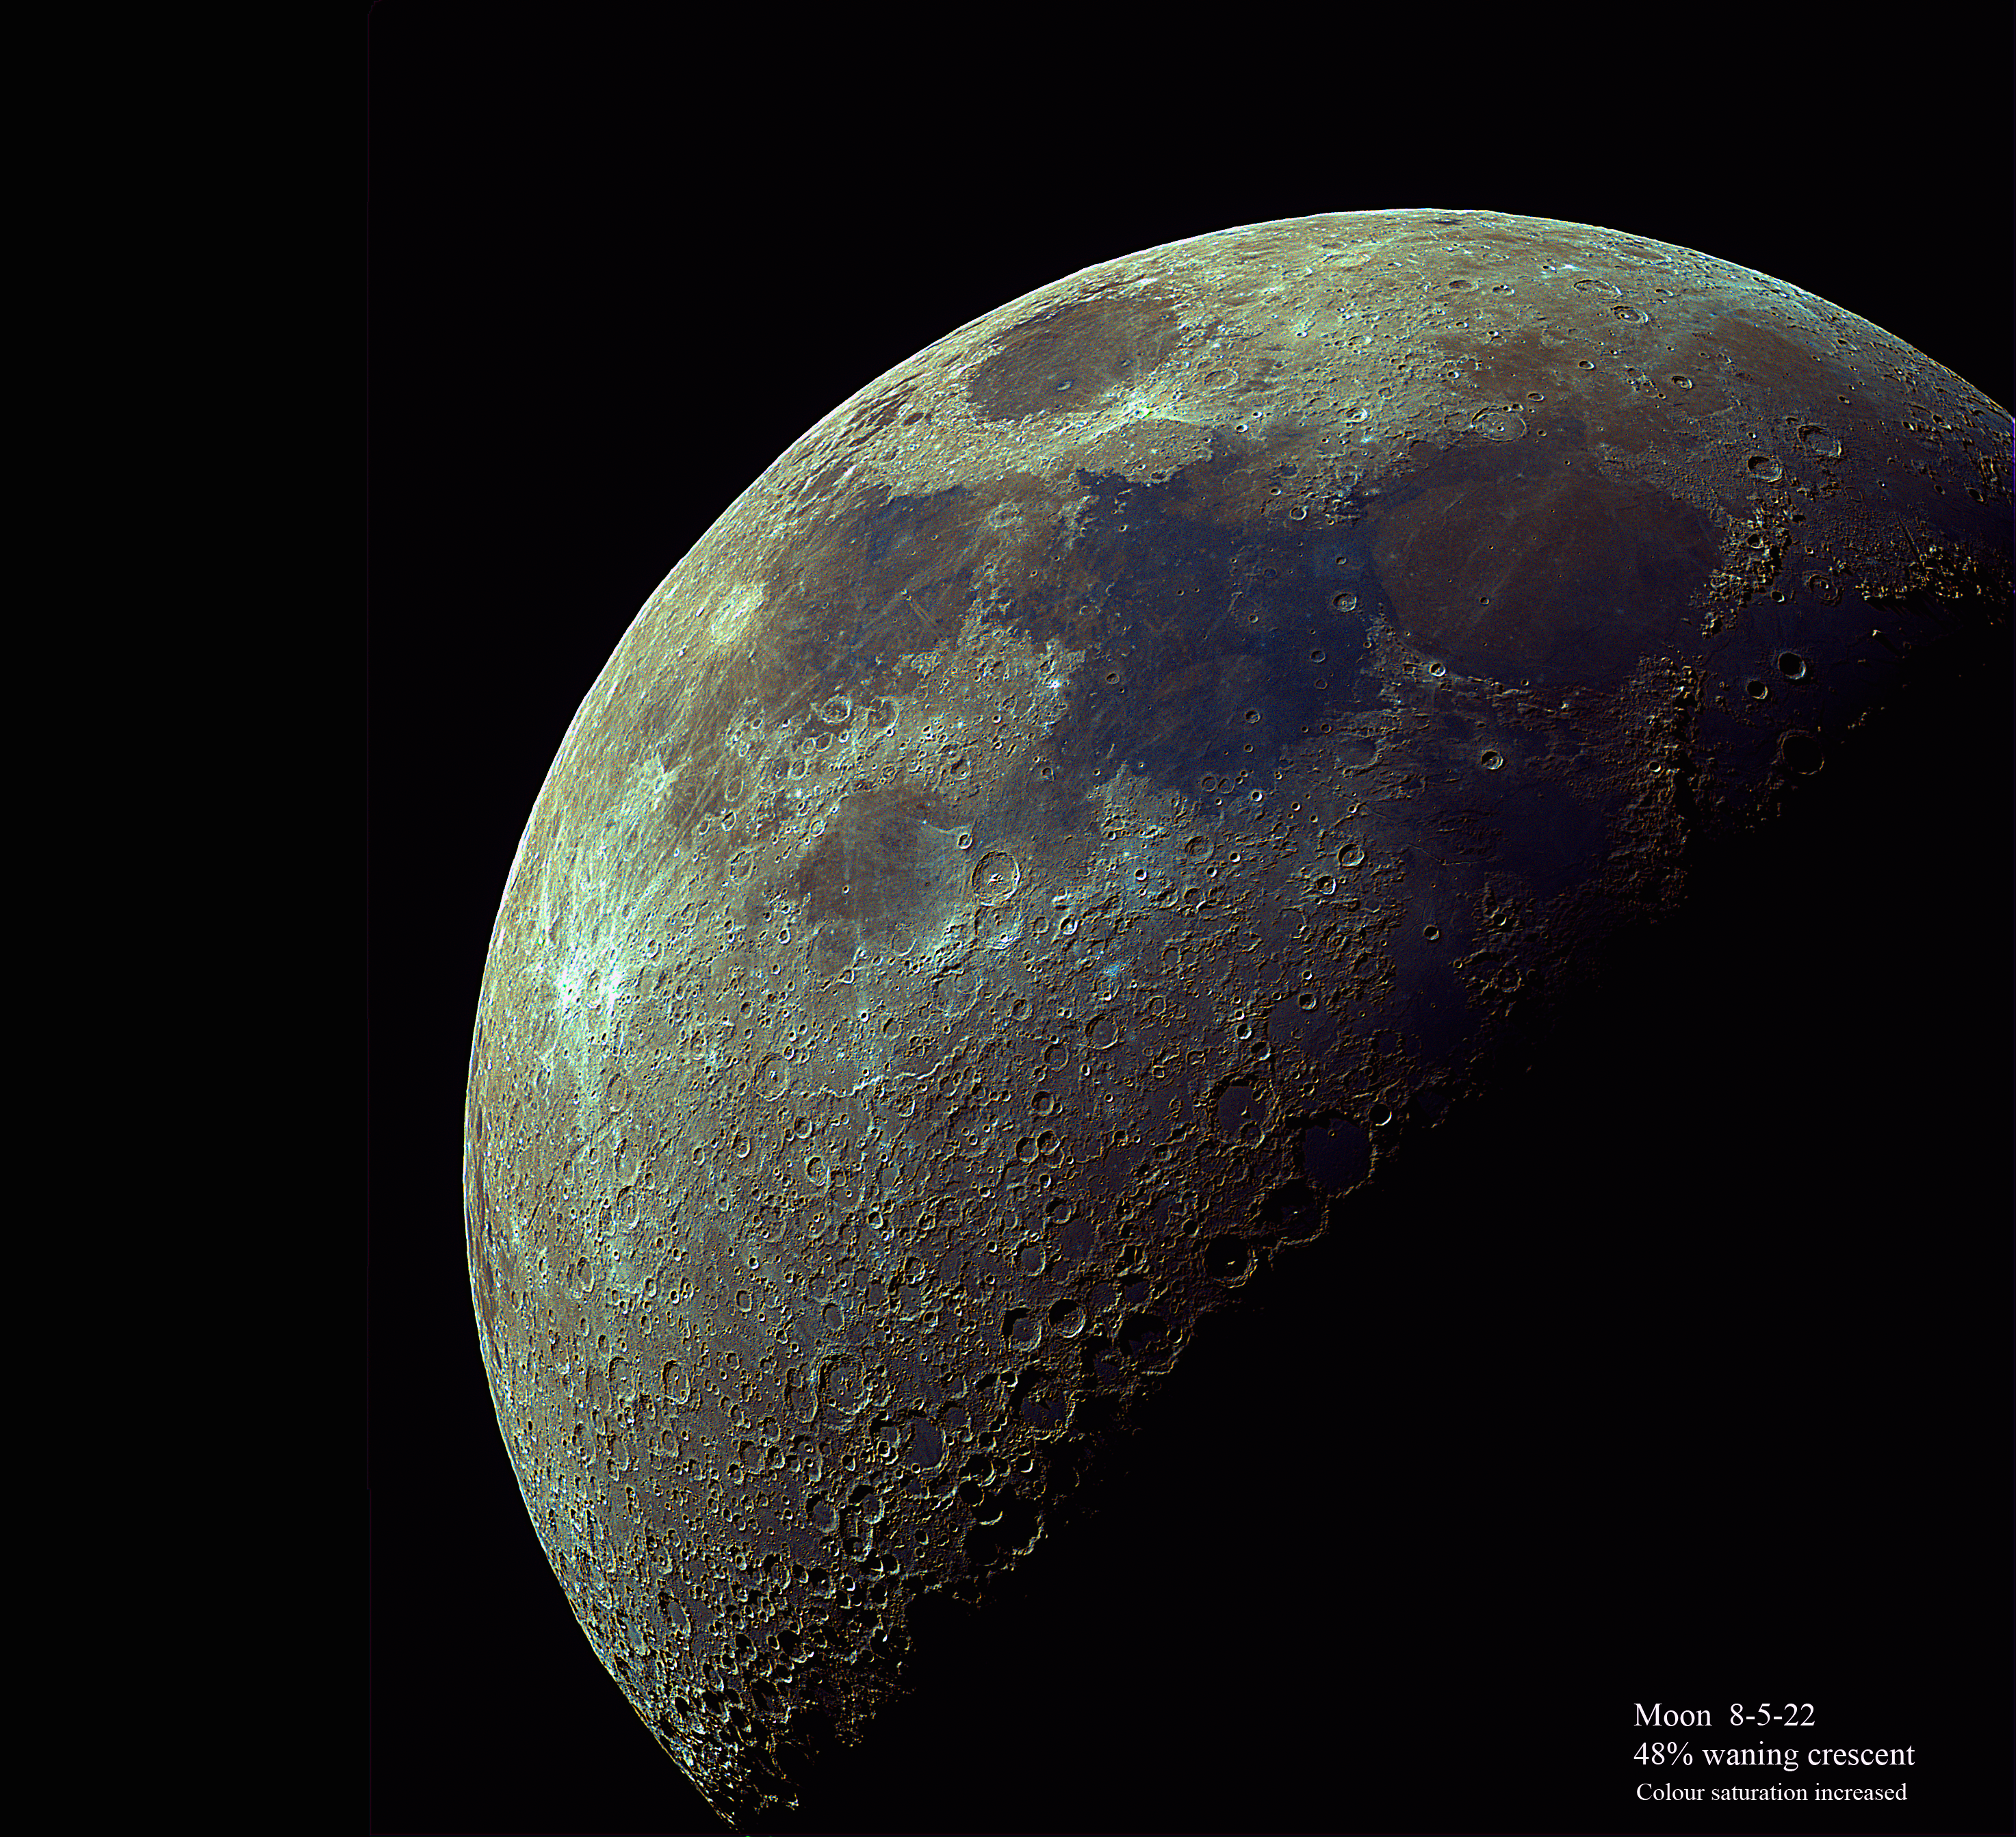
| Although not taken on the day, or even through the same telescope, this is similar to the view everyone would have had of the Moon during our morning session. I’ve added a few labels, including the Apollo 11 landing site, to make it easier to orient ourselves. For a good quality lunar map I have installed ‘LunarMapHD’ on my phone. |
In order to avoid having anyone get too cold – anyone other than me and the member of staff with me that is – there were only eight pupils out there at any one time and they were all wrapped up against the chill. Finally, the staff members also had a chance to take a peek before we bundled back inside for an extended and wonderfully lively Q&A session. As with my visit to the school towards the end of the last academic year, when the previous Year 5 classes had the chance safely to observe sunspots (see here), the questions posed were far-ranging and challenging. More than once I had to say that I didn’t have an answer, but on the whole we were able to cover a lot of ground to everyone’s satisfaction. Some of the questions opened up important generic topics like the nature of science and the need to make decisions based on the best available evidence, whereas others were a lot more specific. In that latter camp there were many which arose from what they’d observed: what are the darker areas and why are there fewer craters within them; why are there some areas that seem particularly bright; how did the Moon form …? (Answers below.) We also explored the lifetime of stars, exoplanets and a question that arose at least three times in one guise or another: why are the planets different colours?
 |
| This is a composite image of a few of the morning's lunar observers; such a great bunch. (The images are included with appropriate consent and permissions having been obtained.) |
All-in-all I was deeply impressed by the degree of their engagement and by their perceptive and well-phrased questions. I suspect that there are several budding scientists in their number, and I wish them well.
Happy lunar observing everyone 😀.
____________________________________
* I absolutely must mention the warm and enthusiastic welcome I got at The Churchill School which included the help of two class members, Teddy-Rose and Lewis (see image below, reproduced with appropriate permissions): with great care they helped me to ferry my equipment from the car to the playground we’d be using. The staff were amazing, and filled me with confidence that these children were in the best of hands: thank you for the invitation Mrs. Newport (yes, well spotted: the best of daughters-in-law) and thank you to your colleagues: Mr. Moore, who braved the cold with me in order to take photographs, Mrs. Lejeune and Mrs. Coleman. Also, many thanks to the school’s Deputy Head, Andrew, who made me a mug of tea 😊.

The darker areas are solidified lava flows following a past impact. If something large enough collided with the Moon there’d be sufficient energy released to melt some of the lunar surface – to turn it into lava – which then cools and solidifies to leave a smooth patch. This violent process will of course obliterate all traces of former craters caused by smaller impact events, which is why there are fewer craters to be seen. It also means that any craters that do sit within a lava sea were caused relatively recently in geological terms.
The Moon formed from the debris of a gigantic collision between an original Earth and another body about the size of present-day Mars which took place in the early stages of the solar system. This is almost certainly easier to comprehend in pictures than through words alone, so take a look at one or both of these video clips: BBC, NASA.
There’s no left or right, up or down in space so I’ll not apologise for the fact that this image of mine is flipped horizontally compared to the earlier one. The point of including it is to show that even the Moon has colour. We don’t see it because it’s muted and because it’s so bright overall that the colours are washed out – technically, it has a high albedo which simply means that it reflects a high percentage of the sunlight falling on it. However, in a digital image it’s possible to increase the colour saturation whilst holding back the brightness to show that the Moon’s surface geology does indeed imbue colour. As with all the planets, they appear as one colour or another by virtue of what’s on the outer surface. Thus Venus appears white because it’s totally covered with reflective clouds, whereas Mars has a reddish hue because there’s a lot of rust (oxidised iron compounds) on its surface; Uranus and Neptune appear blue-green and blue because of the hydrocarbon gasses which make up their respective atmospheres. (The Sun and other stars are different simply because they generate their own light; their varying colours from red to blue arise from their surface temperatures.)

There are several particularly bright areas which, if one looks closely, often seem to be associated with bright ‘rays’ extending from a crater or cluster of craters. It turns out that there is quite a lot of glass on the Moon’s surface – made when material was melted in a collision with, perhaps, a small asteroid – and it’s this material that reflects so much sunlight. Most domestic glass on Earth, like window glass for example, is made from a mixture of various chemicals with silica (sand!) but we can make a glassy material from all sorts of source materials if the heating and cooling rates are right. There are some terrestrial examples of this shown in the image above. The material shown on the left is a naturally-occurring glass called tektite and the yellowy material next to it is often referred to as ‘desert glass’; both are relatively pure samples of silica glass made when a meteorite plummeted into desert sand. The central image is of obsidian glass, which is formed in a volcano. The sample on the right is a glassy material which formed as a waste product in a commercial furnace dating to the Middle Ages.

Subscribe to:
Posts (Atom)